Transforming simple chicken breasts into a culinary masterpiece doesn't require complex techniques or exotic ingredients. Enter blackened chicken: a dish renowned for its incredible flavor, delightful texture, and surprising ease of preparation. Imagine succulent, juicy and tender chicken encased in a deeply seasoned, bold crust that crackles with every bite. This isn't just a recipe; it's a game-changer for weeknight dinners, meal prep, and impressing guests.
Far from being intimidating, truly great blackened chicken is all about confidence in the kitchen and understanding a few simple principles. It’s a versatile protein that effortlessly elevates everything from fresh salads and vibrant grain bowls to spicy tacos and hearty pasta dishes. If you're ready to unlock a world of flavor, read on to discover how easy it is to achieve perfection every time.
What Exactly is Blackened Chicken? Unpacking the Technique
The term “blackened” might sound intimidating, conjuring images of burnt food, but nothing could be further from the truth. In the world of Master Blackened Chicken: Cajun-Inspired & Weeknight Versatile, blackening refers to a specific cooking technique, rooted deeply in Cajun cooking traditions, that creates a dark, flavorful crust on meat or fish without burning it. It’s a testament to the power of high heat and a robust spice blend.
The Magic of the Maillard Reaction
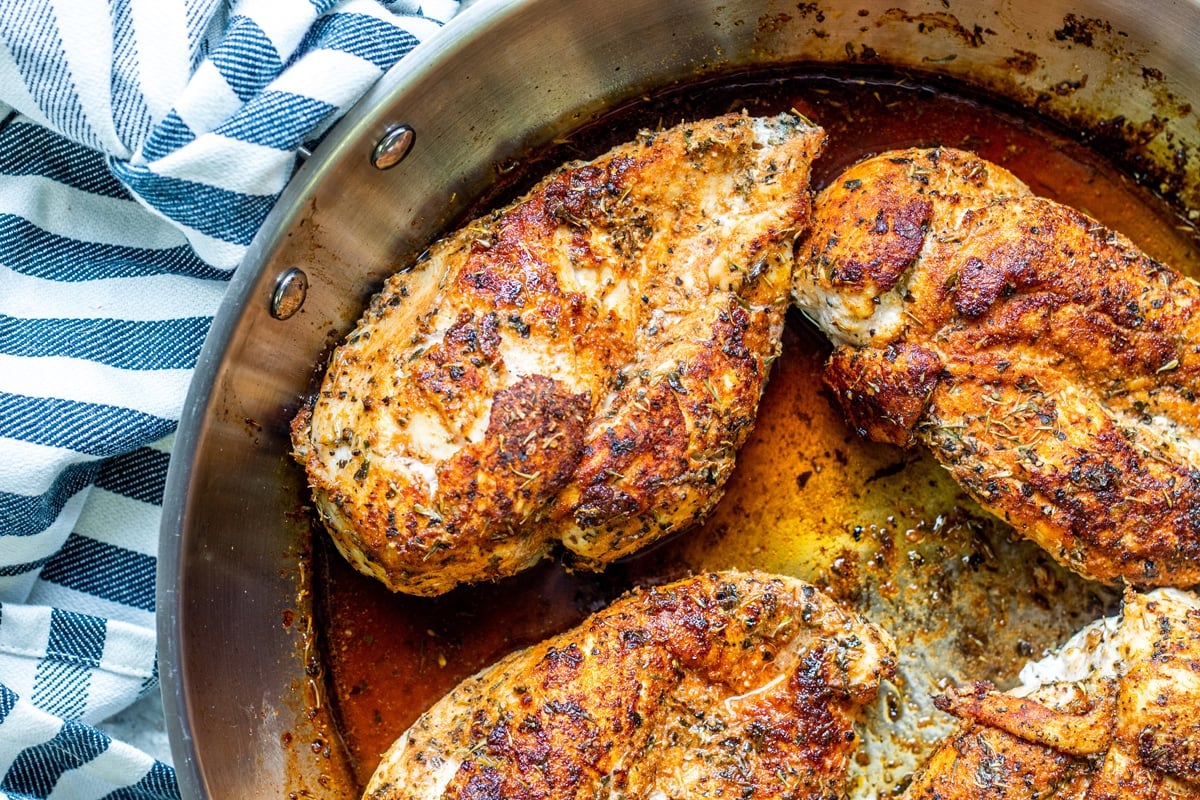
At its core, blackening relies on searing seasoned chicken in an incredibly hot skillet, typically cast iron. This intense heat does two crucial things: it quickly caramelizes the sugars and proteins on the chicken's surface (the Maillard reaction), and it toasts the spices in the unique blend. The result is a profoundly savory, slightly smoky, and wonderfully aromatic bold crust that is the hallmark of perfectly blackened chicken. The key is to achieve this beautiful dark char without incinerating the spices, which would lead to a bitter taste.
The Two-Step Secret to Juicy Perfection
While the searing creates that magnificent crust, the secret to keeping the chicken juicy and tender inside lies in a clever two-step cooking method. After an initial, fierce pan-sear, the chicken is typically transferred to the oven to finish cooking through. This allows the internal temperature to rise gradually and evenly, ensuring the meat remains moist and succulent, never dry or rubbery. This combination of a high-heat sear and a gentle oven finish is what makes blackened chicken so consistently delicious and satisfying.
Crafting the Perfect Blackened Chicken Spice Blend
While store-bought blackened seasoning blends are available, creating your own homemade spice blend is incredibly rewarding. It allows you to customize the flavor profile to your exact preferences, from the level of heat to the herbaceous notes. Plus, it uses common pantry staples, making it an accessible and economical choice.
Essential Ingredients for Your Homemade Blend
A classic blackened chicken spice blend draws inspiration from Cajun and Creole flavors, balancing savory, spicy, and aromatic elements. Here’s a breakdown of what typically goes into it:
- Paprika: Provides color, a touch of sweetness, and mild capsicum flavor. Both sweet and smoked paprika can be used for different nuances.
- Cayenne Pepper: The primary source of heat. Adjust to your desired spice level.
- Garlic Powder & Onion Powder: Aromatic foundational flavors that are indispensable.
- Dried Thyme & Dried Oregano: Classic herbaceous notes that define Cajun cuisine.
- Salt & Black Pepper: Essential for seasoning and enhancing all other flavors.
- Optional Additions: Cumin for earthy depth, white pepper for a different kind of heat, a pinch of brown sugar for extra caramelization, or dried mustard for a subtle tang.
Customizing Your Flavor Profile
The beauty of a homemade spice blend is its flexibility. Love a fiery kick? Amp up the cayenne. Prefer a smokier taste? Use smoked paprika. For a milder version, reduce the cayenne or swap some for extra paprika. We recommend mixing a larger batch of your blackened chicken seasoning and storing it in an airtight container. This way, it’s always ready for your next culinary adventure, making easy blackened chicken even easier!
Mastering the Pan-Sear & Oven Finish for Optimal Results
Achieving that glorious bold crust and juicy and tender interior isn’t difficult, but it does require attention to a few key steps. The technique is straightforward, but precision makes all the difference.
Preparation is Key
- Chicken Prep: Start with boneless, skinless chicken breasts (or thighs, as suggested by Ottolenghi for an intense flavor, ensuring good ventilation!). Pat them thoroughly dry with paper towels. Moisture is the enemy of a good sear, as it prevents the Maillard reaction. For even cooking, you might want to pound thicker chicken breasts to a uniform ½-inch thickness.
- Season Generously: Liberally coat both sides of your chicken with your homemade spice blend. Don’t be shy – this is where all the flavor comes from!
The Searing Process: Heat, Oil, and Ventilation
- Choose Your Skillet: A cast-iron skillet is highly recommended for blackening. Its superior heat retention and even heating properties are ideal for developing that perfect crust.
- High Heat is Crucial: Place your skillet over medium-high to high heat. You want it screaming hot. A good test is to add a few drops of water; if they sizzle and evaporate immediately, it’s ready.
- High Smoke Point Oil: Add a thin layer of oil with a high smoke point (like avocado oil, grapeseed oil, or canola oil) to the hot pan.
- Ventilation: This step cannot be stressed enough, especially when cooking with high heat and spices. Ensure your kitchen is well-ventilated by turning on your exhaust fan and opening windows. As Ottolenghi’s Blackened Chicken: Intense Char & Vibrant Dressing emphasizes, don’t be afraid to really char your chicken, but always ensure good airflow!
- Sear, Don't Overcrowd: Place the seasoned chicken breasts in the hot skillet, ensuring not to overcrowd the pan. Cook in batches if necessary. Sear for 2-3 minutes per side, until a deep, dark, and flavorful crust has formed. Resist the urge to move the chicken too soon; let that crust develop.
Finishing in the Oven for Tenderness
Once both sides have a beautiful blackened crust, transfer the chicken, still in the oven-safe skillet, to a preheated oven (usually around 375-400°F / 190-200°C). Finish cooking for another 8-12 minutes, depending on the thickness of your chicken, or until the internal temperature reaches 165°F (74°C). This gentle oven finish locks in the juices, guaranteeing a juicy and tender result.
The All-Important Rest
Once cooked, remove the chicken from the oven and let it rest on a cutting board, loosely tented with foil, for 5-10 minutes. This allows the juices to redistribute throughout the meat, ensuring maximum tenderness and flavor. Slicing too soon will cause the juices to run out, leading to dry chicken.
Beyond the Plate: Versatility & Serving Inspiration
One of the most remarkable qualities of easy blackened chicken is its incredible versatility. It’s a flavor-packed protein that can be the star of countless meals, making it perfect for meal prep and impromptu dinners alike.
Weeknight Hero & Meal Prep Powerhouse
Because it comes together quickly and holds flavor beautifully, blackened chicken is a quintessential weeknight versatile dinner. Cook a larger batch on Sunday, and you'll have a ready-to-go protein for healthy lunches and dinners throughout the week. It reheats wonderfully and can be repurposed in myriad ways.
Creative Serving Ideas
- Salads: Slice the chicken and add it to your favorite green salad with a zesty vinaigrette, or a hearty Cobb salad.
- Tacos & Wraps: Shred or dice the chicken for flavorful tacos with fresh salsa, avocado, and a squeeze of lime. It’s also fantastic in lettuce wraps or flour tortillas.
- Bowls: Create vibrant grain bowls with quinoa or rice, roasted vegetables, and a creamy dressing.
- Sandwiches & Paninis: Pile sliced blackened chicken onto a sandwich with provolone cheese and roasted red peppers.
- Pasta: Toss with a creamy Alfredo sauce, some sautéed bell peppers, and onions for a Cajun-inspired pasta dish.
- Classic Dinner: Serve alongside simple roasted vegetables (like asparagus or broccoli) and a side of dirty rice or mashed potatoes for a comforting meal.
And for those looking to explore an even more gourmet take on this classic, consider venturing into Ottolenghi’s Blackened Chicken: Intense Char & Vibrant Dressing, which introduces unique flavor combinations like caramel and clementine dressing, proving just how adaptable the blackening technique can be.
Conclusion
Easy blackened chicken isn't just a recipe; it's an invitation to elevate your home cooking with minimal effort and maximum flavor. By understanding the simple technique of a high-heat sear followed by an oven finish, and by crafting your own versatile spice blend, you can consistently achieve chicken that is juicy and tender with a show-stopping bold crust. Embrace the delicious journey into Cajun-inspired cuisine, and discover a new favorite protein that promises to be a reliable, flavor-packed, and incredibly versatile dinner solution for any occasion.
